Compass Course
Asbury Woods Compass Course
Asbury Woods has a compass course hidden throughout the trails that is fun for the whole family to explore. We've provided instruction about how to use a compass as well as directions for each course. Don't have a compass? No problem! There are many free compass apps that can be downloaded to a phone or tablet. A compass app is an easy option for navigating the course. Simply turn your body until the desired heading appears on the screen of your device.
The Parts of a Compass
A compass is a tool used for navigation. Inside of the compass there is a two-ended magnet. The red end always points magnetic north, and the black end always points magnetic south. There are a possible 360 different directions that a compass can help you to travel. Learn about the parts of a compass then follow the steps below to make your compass course experience a success.
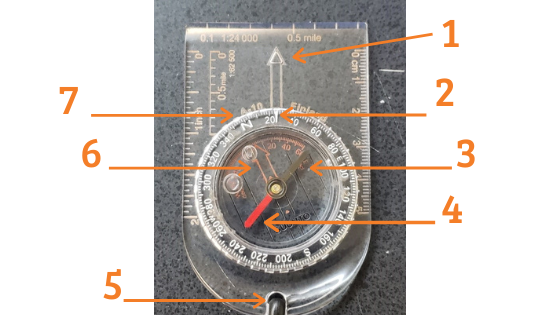
- Direction of Travel Arrow: This arrow never moves. As you hold the compass in your hand that arrow will show you the direction to walk. Always walk forwards when using a compass.
- Fixed White Line: This line does not move on the compass dial. The “# degrees” in the directions should be lined up over this line.
- Magnetic South: The black end of the magnet always points magnetic south.
- Magnetic North: The red end of the magnet always points magnetic north. We nickname this arrow “Red Fred.” (Note: This is NOT the arrow you follow to use a compass)
- Strap: Place the strap around your neck or wrist so that you don’t drop the compass.
- “Red Fred’s Shed”: The red outlined arrow inside of the compass dial is nicknamed “Red Fred’s Shed.”
- Compass Dial: This dial spins on the compass and has the 360 possible directions you can travel in. Spin this dial until the correct “# degrees” is on the fixed white line under the dial face. Each small line represents 2 additional degrees and odd numbers are located in the space between the small white lines.
How To Use a Compass on the Asbury Woods Course
- Place the strap around your neck or wrist
- Hold the compass flat in your hand with the curved edge close to your body and the flat edge towards the tips of your fingers
- Read your first direction on the directions sheet. It will tell you to walk a certain number of paces (steps) at a certain degree.
- Find the # degrees on the compass dial and spin the dial until that number is directly over the fixed white line.
- Turn your whole body slowly around in a circle keeping an eye on the red magnetic north arrow (Red Fred)
- Stop turning when the red magnetic north arrow is inside of the red outlined arrow in the center of the compass dial (Red Fred’s Shed)
- You are now facing the direction that you need to walk. With the direction of travel arrow pointing you forward, begin walking and counting your paces. Red Fred should stay in or very close to his shed as you’re walking.
- The paths on the compass course are not straight so Red Fred may come out of his shed but follow the trail and continue counting your paces until you reach the next compass post
- Follow the written course directions until you’ve completed the course
Ex: Walk 20 paces at 200 degrees (# degrees)
Getting Started
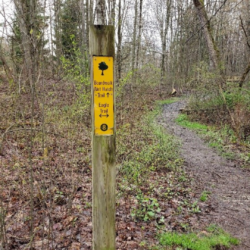
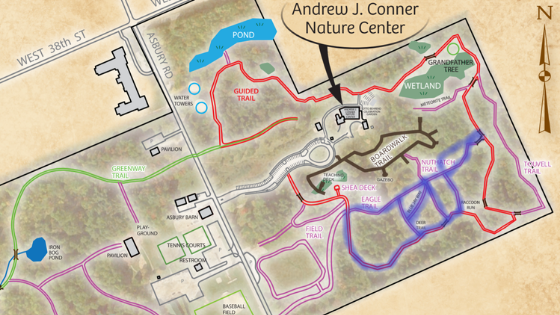
Enter the boardwalk trail and follow the boardwalk around to the ramp that connects to the Nuthatch Trail. Follow the Nuthatch trail until it intersects with the Eagle Trail. There is a small grassy clearing in the in the center of the trails where many of the compass course instructions begin. Check the instructions for further directions as to exactly where to start. The trails on the map outlined in blue are part of the compass course.
Asbury Woods Compass Courses
Download the directions for the different compass courses from this page to your phone or print them out to use along the trails. Each course will help you to navigate different ways around the compass course trails. The course directions will include different course markers that you’ll need to look for.
Course 1 Yellow Team
Course 1 White Team
Course 1 Red Team
Course 1 Brown Team
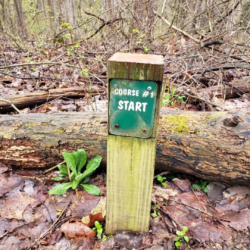
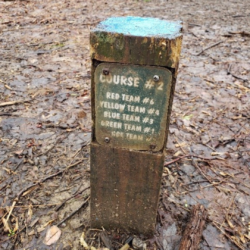
Compass Post – Each direction on the instructions will lead you to a compass post. Check to see if you made it to the right spot by looking for your course color on the side of the post. Be sure to check the right side! We have Course 1 colors AND Course 2 colors on each post. The number following the team color is the order in which you are supposed to find the posts. (Ex: Red Team #6 means this was the 6th post to find on their instructions page)